
Data science is one of the key trending industry topics at present. Organizations are using data insights to make data-driven decisions for their business operations.
Creating data science models is an important step in a Data Scientist’s workflow. There are a few popular frameworks for deploying these models, such as Django and Flask. However, to make the ML model available as a web application, Data Scientists must also be familiar with Javascript, HTML and CSS. The question here is whether such high-level frameworks are required to deploy models. Because learning the frameworks and creating web apps from scratch takes time. Well, if you are a Data Scientist, I wouldn’t recommend it.
Since the existing frameworks come with a hassle, Streamlit was developed. It is an open-source python library for building fast and beautiful web apps. This can be used to deploy Machine Learning models or any python projects without worrying about the frontend. Streamlit is user friendly, and no prior knowledge of other frameworks is needed. It is not necessary to create a backend, define different routes, or handle HTTP requests. Streamlit handles everything. Let’s see how easily we can deploy and perform interactive machine learning models using Streamlit.
Installation: pip install streamlit (Make sure you have Python installed in your system) Create a python file called “app.py” and type the following code in it to get hands-on experience on Streamlit.
app.py –>
import streamlit as st
st.title(“Welcome to Evoke Technologies”) -> you will be able to see the title with the given content
st.header(“This is a header”) -> same goes with st.subheader(“xxxxxxx”)
st.text(“This is used to display simple text”)
st.success(“This is used to display Success messages in a green box”)
st.warning(“This is used to display Warning message in orange box”)
st.error(“This is used to display Error messages in red box”)
st.info(“This is used to display Information in a blue box”)
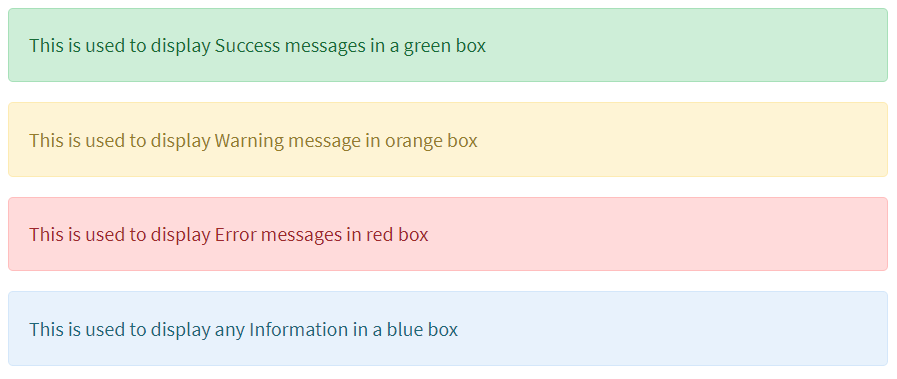
This is how the output looks for the above lines.
We can also display images on the webapp. This can be done using an additional library called PIL.
from PIL import Image
img= Image.open(“……type the path of the image……..”)
st.image(img, widht= 200)
out_value= st.checkbox(“Select/Deselect”) -> out_value is True only if the checkbox is selected.
select= st.radio(“title of the radio button”, (options for radio button))
select= st.radio(“Select Gender”, (‘Male’,’Female’,’Other’))
select becomes the value that the user selects.
fruit = st.selectbox(“Fruits: “, [‘Mango’, ‘Apple’, ‘Watermelon’])
fruit becomes the value that the user selects
fruit = st.multiselect(“Fruits: “, [‘Mango’, ‘Apple’, ‘Watermelon’])
user is allowed to select more than one options.
btn =st.button(“Click Me”)
btn becomes True when user clicks on the button
st.image(“…..type the path of the image………”) displays the image on the web page
Do you guys also feel that there are many elements on the screen? Do not worry, there is a sidebar that comes in handy.
Use st.sidebar.xxxxxx to place the elements in the sidebar. For example,
st.sidebar.button(“Click me”) places the button in the sidebar.
If you want to navigate through different web pages, it is better to make use of radio buttons instead of Buttons. Since the button holds the name of the option the user selects, the code can be programmed in such a way that it renders a page that matches the selection of the user.
Here’s how it can be done:
select= st.radio(“Select Gender”, (‘Male’,’Female’,’Other’))
if select == “Male”:
#implement the code related to option Male
elif select == “Female”:
#implement the code related to option Female
elif select == “Other”:
#implement the code related to option Other
The page shows the content based on the selection made by the user. It is better to place the navigation items in the sidebar. All you need to do is to make a small change; st.sidebar.radio()
If you want to place the elements at the centre of the screen by using columns.
col1, col2, col3 = st.columns([53,33,33])
with col1:
st.write(“”)
with col2:
con= st.button(“Convert”, on_click= extract_data, args= [opt])
with col3:
st.write(“”)
Changing the values in st.columns moves the position of the button placed in col2. In the above code, on_click is the callback where we can call the ML model.
If you know how to create pickle or h5 files, you can use the above functionalities to deploy the ML/DL models that were built. Streamlit also gives you “Streamlit Share feature” to deploy your Streamlit web app on the internet for free.
If you need a title and logo for your webpage, Streamlit provides that too.
st.set_page_config(page_title= “Evoke Ex-Stream App”, page_icon=”evoke_logo.png”)
Note that this should be placed at the top of the code (just after you make all library imports).
When you are done with coding in app.py, go to terminal and streamlit run app.py will execute the code and open a web browser. Looks like this:
You can now access your Streamlit app in your browser.
Local URL: http://localhost:8501
Network URL: http://176.16.17.136:8501
Enjoy the models on the web with very little and Ex-Stream-ly easy code.
Happy Coding!

Author
 |
Shreeram Mandaleeka is a Technical Associate at Evoke who enjoys working on different technologies and interacting with people. He spends most of his time writing Python and strives to create products that make people’s lives easier. In his spare time, he enjoys singing, sports, exploring new technologies, long rides, and photography. |