

Selenium WebDriver is one of the famous functional automation tools/APIs currently in the market. Many companies are already implementing their automation frameworks using Selenium WebDriver, as it is an opensource automation framework and can be written in any of the popular programming languages.
However, like any other tool, it has its own set of limitations. One of the limitations is handling window-based pop-ups, as the web driver automates only browsers. For instance, in case your test case needs to upload a file and perform some other actions on the webpage, it may not be able to do it successfully. That’s because “File Upload” is a window-based popup. In such a scenario, you will have to investigate some third-party tools/APIs which can automate windows-based applications.
To combat this challenge, we will integrate third-party tools like AutoIT, Sikuli (Windows Automation Tools), etc. However, in these tools, the APIs support only a handful of languages and require specific procedures for integration. Along with that, the syntax and code will be different than the Selenium code.

To overcome these issues, we can use WinAppDriver to automate Window-based functionality (for ex: File Upload). The WinAppDriver can also be tightly integrated with the Selenium Web driver since the code is very similar to the WebDriver code. Avoid learning curve on any specific language or tools to leverage WinAppDriver and Web driver integration.
What is WinAppDriver?
WinAppDriver means Windows Application Driver and it is a service to support Selenium-like UI Test Automation on Microsoft Windows-based applications. WinAppDriver supports testing Universal Windows Platform (UWP), Windows Forms (WinForms), Windows Presentation Foundation (WPF), and Classic Windows (Win32) apps on Windows 10 PCs.
Pre-Requisites to setup WinAppDriver:
- Windows 10 Machine
- Enable Debug Mode in Windows10 machine
- Add Selenium dependencies to the project
- Add Java-Client (Appium) dependencies
- WinAppDriver server should be running on the machine
- Any one of the elements inspecting tools like inspect.exe, WinAppDriver Recorder or Appium Desktop, etc.
WinAppDriver Setup Steps:
- Download the latest WinAppDriver installer from this location
- Run the installer on Windows 10 machine where your application under test is installed
- Enable Developer Mode in Windows Settings
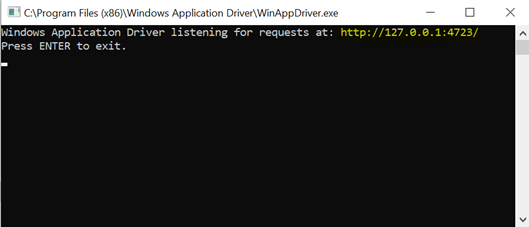
- Run WinAppDriver.exe from the installation directory (i.e. C:\Program Files (x86) \Windows Application Driver) [This step can be avoided using the code which is discussed in the upcoming sections of this blog post]
a. WinAppDriver will then be running on the test machine listening to requests on the default IP address and port (127.0.0.1:4723) - Write the WinAppDriver program and execute
As discussed in the point 6 of Pre-Requisites above, use inspect tool to find the elements on the windows-based pop-up to demonstrate the scenario. Following is the procedure to get the inspect tool on your machine.
Finding the Elements using Inspect.exe Tool:
To get the inspect.exe tool, we need to install Windows SDK in our machine. When you download and install Windows SDK, you can find the inspect.exe in the below mentioned location:
C:\Program Files (x86) \Windows Kits\10\bin\\x64 (Ex: C:\Program Files (x86)\Windows Kits\10\bin\10.0.18362.0\x64)
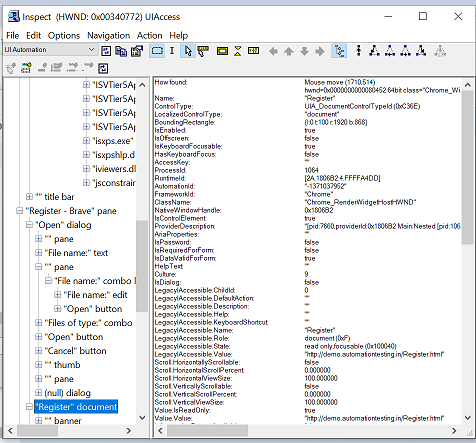
Following is the sample UI screenshot of the inspect.exe tool:
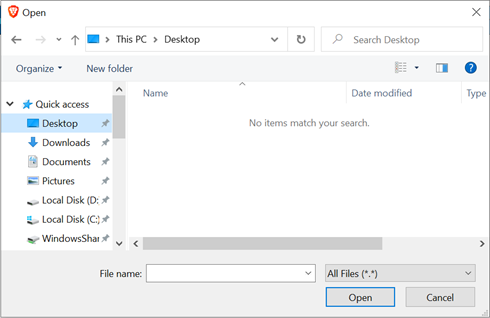
Following is the File Upload Window Popup Screenshot to demonstrate handling window-based popup using WinAppDriver in WebDriver:
In the above screenshot, we need to inspect the File Name textbox and open button. To do use the inspect.exe tool. Following are the screenshots for inspecting both the elements and the screenshots showing their properties of the element being inspected.
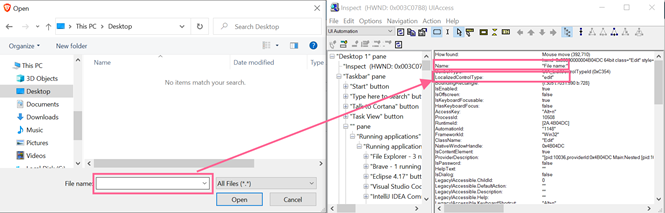
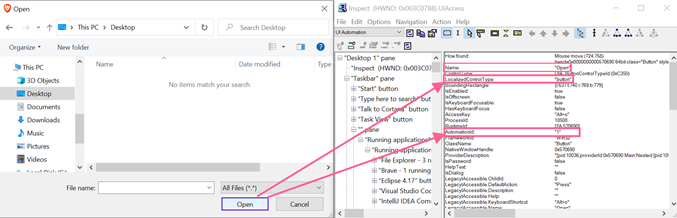
By using these properties, we can find the locators of that element as below:
- XPath
- Name
- Accessibility id
- Automation id
- Class name
- Tag name (Localized Control Type), etc.
Sample Program to Demonstrate Integration of WinAppDriver With WebDriver:
1. Start the WinAppDriver server by running the winappdriver.exe file. Screenshot is shared below for reference.
2. Create a Java Maven project and add the following dependencies:
<dependency>
    <groupId>io.appium</groupId>
    <artifactId>java-client</artifactId>
    <version>{include latest/stable version}</version>
</dependency>
<dependency>
    <groupId>org.seleniumhq.selenium</groupId>
    <artifactId>selenium-java</artifactId>
    <version>{include latest/stable version}</version>
</dependency>
3. Below is the sample program for “File Upload” using WinAppDriver in Selenium WebDriver:
import java.net.URL;
import org.openqa.selenium.By;
import org.openqa.selenium.Keys;
import org.openqa.selenium.WebDriver;
import org.openqa.selenium.WebElement;
import org.openqa.selenium.chrome.ChromeDriver;
import org.openqa.selenium.interactions.Actions;
import org.openqa.selenium.remote.DesiredCapabilities;
import io.appium.java_client.windows.WindowsDriver;
public class FileUpload {
		public static void main(String[] args) throws Exception {
       	     System.setProperty("webdriver.chrome.driver", "<Path of chromedriver.exe file>");
          WebDriver driver = new ChromeDriver();
          driver.get("http://demo.automationtesting.in/Register.html");
          WebElement chooseFileButton = driver.findElement(By.id("imagesrc"));
       	     new Actions(driver).click(chooseFileButton).perform();
          // WinAppDriver code starts here
          DesiredCapabilities desktopCapabilities = new DesiredCapabilities();
        	     desktopCapabilities.setCapability("app", "Root");
          WindowsDriver session = new WindowsDriver(new URL("https://127.0.0.1:4723"),desktopCapabilities);
		// uploading a sample file called “Data.txt” from the D drive.
          WebElement openWindowPopupFileNameTextbox = session.findElementByXPath("//Edit[@Name='File name:']");
          openWindowPopupFileNameTextbox.sendKeys("D:\\Data.txt");
          WebElement openWindowPopupOpenButton = session.findElementByXPath("//Button[@Name='Open'][@AutomationId='1']");
          openWindowPopupOpenButton.click();
          // WebDriver code starts again from here
         WebElement hockeyCheckbox = driver.findElement(By.id("checkbox3"));
          hockeyCheckbox.click();
          driver.quit();
    }
}
In the above example, when you click on Choose File button, it opens “File Upload” pop-up which is Windows-based and cannot be identified and interacted by Web driver. Here, we can integrate WinAppDriver to interact with the windows-based pop-ups to automate rest of the test steps.
DesiredCapabilities desktopCapabilities = new DesiredCapabilities();
        	     desktopCapabilities.setCapability("app", "Root");
          WindowsDriver session = new WindowsDriver(new URL("https://127.0.0.1:4723"),desktopCapabilities);
The above code is useful to take the control of the entire desktop to interact with Windows-based elements. To achieve that, we need to set the “app” capability as “root” and create an instance of the Windows Driver.
To Identify the “File Name” textbox, we have written XPath by using some of the properties of that particular element using the inspect tool. Following is the XPath and code for your reference.
WebElement openWindowPopupFileNameTextbox = session.findElementByXPath("//Edit[@Name='File name:']");
          openWindowPopupFileNameTextbox.sendKeys("D:\\Data.txt");
Similar steps for XPath to find the “Open” button on the File Upload pop-up.
WebElement openWindowPopupOpenButton = session.findElementByXPath("//Button[@Name='Open'][@AutomationId='1']");
          openWindowPopupOpenButton.click();
Our actual scenario (i.e., File Upload) ends here. However, post completion of “file upload” the script should continue to interact with the elements on the web page. For that, the following code will help:
WebElement hockeyCheckbox = driver.findElement(By.id("checkbox3"));
          hockeyCheckbox.click();
As promised in the starting of this post, we can run the WinAppDriver server programmatically to avoid manual intervention. The below sample code will help in starting WinAppDriver programmatically and automating the File Upload functionality.
import java.net.MalformedURLException;
import java.net.URL;
import org.openqa.selenium.By;
import org.openqa.selenium.WebDriver;
import org.openqa.selenium.WebElement;
import org.openqa.selenium.chrome.ChromeDriver;
import org.openqa.selenium.interactions.Actions;
import org.openqa.selenium.remote.DesiredCapabilities;
import io.appium.java_client.windows.WindowsDriver;
public class FileUploadUsingWinAppDriver {
    public static void main(String[] args) throws Exception {
     	        System.setProperty("webdriver.chrome.driver", "<Path of chromedriver.exe file>");
        WebDriver driver = new ChromeDriver();
     	        driver.get("http://demo.automationtesting.in/Register.html");
        WebElement chooseFileButton  = driver.findElement(By.id("imagesrc"));
       	   new Actions(driver).click(chooseFileButton).perform();
        // Start the WinAppDriver Programmatically
     	        String command = "C:/Program Files (x86)/Windows Application Driver/WinAppDriver.exe";
        ProcessBuilder builder = new ProcessBuilder(command).inheritIO();
     	        Process process = builder.start();
              // WinAppDriver code starts here
        DesiredCapabilities desktopCapabilities = new DesiredCapabilities();
     	        desktopCapabilities.setCapability("app", "Root");
        WindowsDriver session = new WindowsDriver(new URL("https://127.0.0.1:4723"),desktopCapabilities);
             // uploading a sample file called “Data.txt” from the D drive.
        WebElement windowsPopupFileNameTextbox = session.findElementByXPath("//Edit[@Name='File name:']");
        windowsPopupFileNameTextbox.sendKeys("D:\\Data.txt");
        WebElement windowsPopupOpenButton = session.findElementByXPath("//Button[@Name='Open'][@AutomationId='1']");
        windowsPopupOpenButton.click();
             // WebDriver code starts again from here
             WebElement hockeyCheckbox = driver.findElement(By.id("checkbox3"));
        hockeyCheckbox.click();
        	   driver.quit();
     	        // Need to destroy the process as a best practice
        process.destroy();
    }
}
This brings us to the end of this article on How to Handle Windows-based Popups Using WinAppDriver in Selenium WebDriver.
Wish to know more about basic commands in selenium? Feel free to leave your question below. We’ll get back to you in the shortest possible time.
Author
 |
Krishna Sakinala is a Senior Quality Analyst at Evoke Technologies. He is technically adept on Selenium automation with Java and C# languages. Krishna is keen on exploring different types open source automation tools and frameworks. |


