
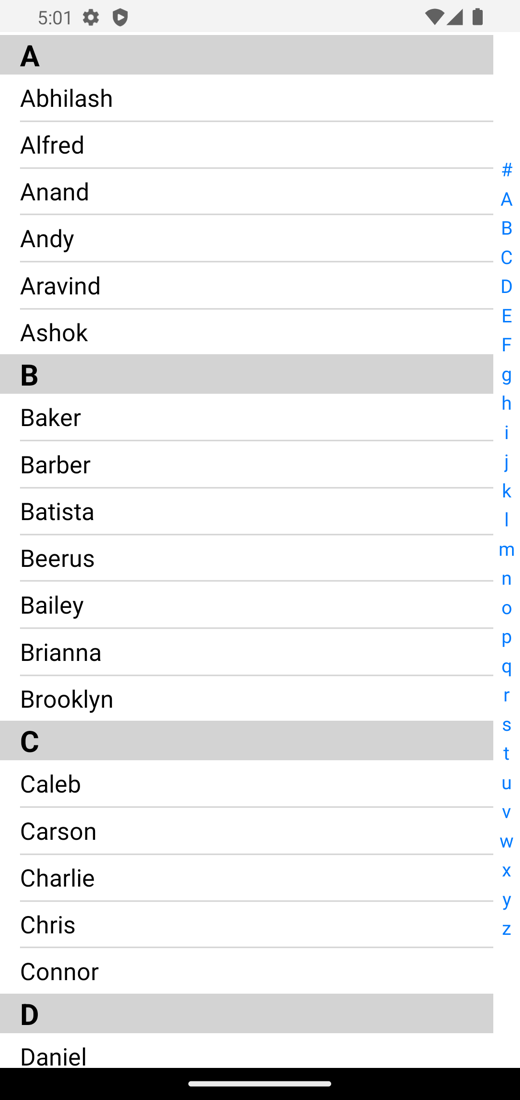
This article focuses on creating a contact list screen as depicted below. It specifically covers the process of designing the user interface (UI) for the contact list. Obtaining the contacts from the mobile device will not be addressed in this article.
The primary objective of this UI is to handle the display of contacts. Therefore, it is assumed that sorting and grouping of the data have already been performed prior to passing the finalized data to this screen for presentation. This approach allows for the implementation of custom logic based on specific business rules.
Once the implementation is completed, the UI will resemble the following:
Pre-Requisites:
Before beginning, make sure to be aware of the following:
- Basic knowledge about React-native.
- Knowledge about pan gestures.
Idea:
The implementation can be divided into two parts for better organization and modularity.
- Alphabet List Component: The first part involves creating a reusable component called “Alphabet List.” This component will be responsible for displaying the alphabet list and detecting user selections through pan gestures. Upon detecting a selection, it will communicate the selected alphabet back to the main screen using this component. The Alphabet List component’s main purpose is to handle the interactive display of the alphabet list.
- Contacts Screen: The second part of the implementation focuses on creating the main screen, which will display the contacts in sections. This screen will utilize the previously created Alphabet List component to show the alphabets on the left side of the screen. The contacts will be grouped into sections based on their first alphabet.
Implementation:
As mentioned above, the implementation will be divided into two sections:
- Creating an Alphabet list.
- Create Contacts list screen using the Alphabet list.
Note: We will implement and check this in the Android simulator. Once we are done with the implementation, we will discuss and perform the changes required in iOS.
- Creating Alphabet list:
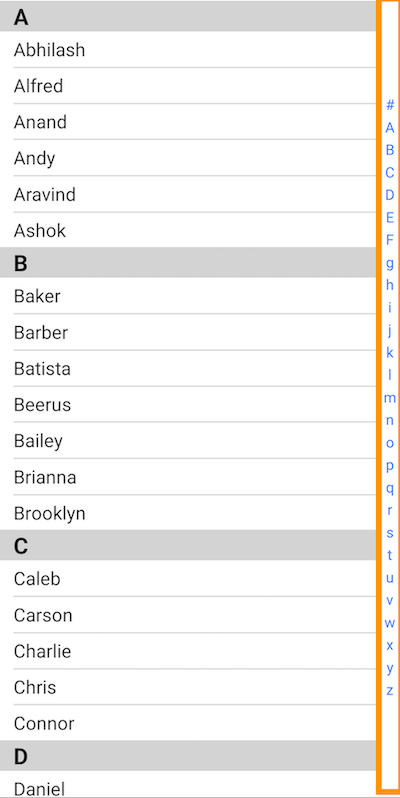
In this Section, we will create an Alphabet list component.
The responsibilities of this component are to display the alphabet list as shown below. It will detect the user selection and pass it back to the screen using the component.
Create a file called AlphabetList.js and add the following code to the file.
//#1
import React, { useRef } from "react";
import { FlatList, PanResponder, Platform, StyleSheet, View } from "react-native";
import { getStatusBarHeight } from "react-native-status-bar-height";
//#2
function AlphabetList() {
    return (


    );
}
export default AlphabetList;
//#3
const styles = StyleSheet.create({
    mainView: {
        backgroundColor: 'clear',
        justifyContent: 'center',
    },
});
Let’s go over the code:
- Imports all the Modules required to implement the screen.
- An empty function that returns an empty view for now. Let’s call this main view (wherever the main view is used in this section it means this view). This view will hold the alphabet list. Then Export the function.
- The styles required for this Main view.
We align the content in the center as the list should be in the center of the screen as shown above.
Now, let’s modify the AlphabetList function to include the following code which will show the alphabet list UI.
//#1
function AlphabetList(props) {
    //#2
    const aplhabetListData = props.data ?? ['#', 'A', 'B', 'C', 'D', 'E', 'F', 'g', 'h', 'i', 'j', 'k', 'l', 'm', 'n', 'o', 'p', 'q', 'r', 's', 't', 'u', 'v', 'w', 'x', 'y', 'z'];
    //#3
    const alphabet_size = { width: props.width ?? 20.00, height: props.height ?? 22.00 };
    return (

            //#4

                //#5
                 {
                        return (
                            //#6

                        );
                    }}
                />


    );
}
Let’s go over the code:
- Add prop to the functions. Any data required for the list from the screen using this function is passed via the “props”.
- This variable holds the Alphabets list which is to be shown. This list can be passed via prop “data” (which should be an array of strings). If no list is passed a default list is used.
- This variable holds the size that each alphabet is allowed to have. The size (i.e., width and height) can be passed via props “width” and “height”. If nothing is passed default values are used.
This width will define the total width this Alphabet List will occupy. - This is the View which holds the Falt list which will show the Alphabet list. Let’s call this holder view (wherever holder view is used in this section it means this view). This view will have a width style which will in turn dictate the main view width.
Later this is the view on which the Pan gesture will be added to identify the user selection. - This is the flat list that will render the alphabets. This takes variable in #2 as data source.
- AlphabetView is the view which is used by the flat list to render alphabet. This view takes the width and height from the variable at #3 via props “width” and “height”. The alphabet which should be rendered is passed via prop ‘text’. We implement this Alphabet view below.
Note: Do not run the project yet. It will throw errors as it has not created AlphabetView yet.
Now Let’s create the AlphabetView.js file and add the following code to it.
import { View, Text, StyleSheet } from "react-native";
//#1
function AlphabetView(props) {
    return (
        //#2

            //#3
            {props.text}

    );
}
//#4
const styles = StyleSheet.create({
    mainView: {
        alignItems: 'center',
        backgroundColor: 'clear',
    },
    textStyle: {
        color: '#007AFF',
    }
});

export default AlphabetView;
Let’s go over the code:
- AlphabetView function returns the view which is rendered by the flat list. Any data required for this view is passed via props. Through props, this view will accept “width”, “height”, “text” and “titleColor”.
- This is the view for AlphabetView. This will control the alignment of the alphabet and the width and height of the text.
- This is the Text component which will show the text passed in “text” prop.
- These are the styles used for view in #2 and text in #3. Even if Width and height are passed in these styles those will be overridden by the “width“ and “height“ props. The same goes for color and textStyle.
Note: Import AlphabetView in AlphabetList.js file and make sure the required props are passed.
Now run the app by returning the AlphabetList in app.js file. This will render the Alphabet list.
Don’t worry about the alignment of the Alphabet List on the screen. Once we add the list of contacts, we will handle the alignment there.
Let’s implement the pan gestures to identify the alphabet selected by the user.
Add the below variable in AlphabetList.js file.
//#1
let selectedAlphabet = -1;
//#2
const panGesture = useRef(
    PanResponder.create({
        onStartShouldSetPanResponder: (event, responder) => true,
        onStartShouldSetPanResponderCapture: (event, gesture) => true,
        onMoveShouldSetPanResponder: (event, responsder) => true,
        onMoveShouldSetPanResponder: (event, responder) => true,
        //#3
        onPanResponderGrant: (event, responder) => {
            const x = responder.x0
            const y = responder.y0
            performSelection(x, y);
        },
        //#4
        onPanResponderMove: (event, responder) => {
            const x = responder.moveX;
            const y = responder.moveY;
            performSelection(x, y);
        },
        onPanResponderTerminationRequest: (event, responder) => true,
        //#5
        onPanResponderRelease: (event, responder) => {
            selectedAlphabet = -1;
        },
        onPanResponderTerminate: (event, responsder) => {
        },
        onShouldBlockNativeResponder: (event, responder) => {
            return true;
        },
    }),
).current;
Let’s go over the code:
- This is used to make sure that each alphabet will be selected only once. Pan gesture will give a call back even with slight movement of the finger while panning. This is required to stop unnecessary calculations.
- This is the pan gesture which will return the screen coordinates of the user tap. Add all the properties for the pan gesture as in the code. This is a basic configuration for the pan to work.
- This is called when the user taps or holds tap on the screen. Once this is called the responder prop returns x0 and y0 which is the position the user tapped on the view to which pan gesture is added (i.e., holder view).
Here we use the x and y position to calculate the alphabet user selected, by passing them to the function performSelection as props. - This is called when the user pans on the view on which the pan gesture is added (i.e., holder view).
Here also we have to do the same as in #3. The only difference here is that we get the moment of the user’s finger on the screen with respect to the holder view. - This is called when the user lifts the finger from the screen and the pan or tap stops.
To reset the selection of the user, we make the “selectedAlphabed = [-1“]. This is done to make sure that the previous selection of the user does not impact the new selection, i.e., if the user had selected A for the previous selection, they should be able to select A again.
This will become clearer when we implement PerformSelection function.
Before we add Pan gesture to view, add the variable below to the function AlphabetList.
let alphabetView_position = { x: 0, y: 0, width: 0, height: 0 };
This is used to calculate the position on the screen where users tap/pan on the screen. Initially, it is zero but since the holder view is center aligned in the main view, this will change once the view is rendered. To overcome this, we will update this variable once the holder view is rendered.
Now, let’s add the pan gesture to the holder view on which pan/tap should be detected.
Make the following changes.
return (

        //#1
         {
            //#2
            alphabetView_position = event.nativeEvent.layout;
        }}>
             {
                    return (

                    );
                }}
            />


);
Let’s go over the code:
- Here pan gesture is added to the holder view. This will make the holder view capable of detecting tap/pan.
- Also, a function is assigned to the onLayout prop of the holder view. This is called once the View is rendered.
As mentioned above, this is the view that has pan and its position changed once the view is rendered. So here we change the alphabetView_position to the new position of the view.
Now add the performSelection function as below. This function accepts x and y positions of the tap/pan.
function performSelection(moveX, moveY) {
    //#1
    const selectedIndex = IdentifyAlphabet(moveX, moveY);
    //#2
    if (selectedIndex >= 0 && selectedAlphabet !== selectedIndex) {
        //#3
        selectedAlphabet = selectedIndex;
        //#4
        props.onSelect(aplhabetListData[selectedAlphabet]);
    }
}
Let’s go over the code:
- Here we identify the index of the alphabet selected by the user in alphabetListData array. This is done using moveY prop.
- Here we check if the selection is valid and if the user has already selected the alphabet.
- Here we assign the selected index to the selectedAlphabet variable we created earlier.
- Once we determine the alphabet selected, we will pass the selected alphabet to the “onSelect“ prop. Pass a function to “onSelect“ prop of AlphabetList. Otherwise, when an alphabet is selected app will crash.
Note: Here moveX and moveY are the position on the screen where the user finger rests on the holder view, which pan gesture returns.
Add the below function. This is used to identify the index of the alphabet based on pan moveX, moveY, and alphabetView_position.
function IdentifyAlphabet(moveX, moveY) {
    //#1
    let alphabetIndex = selectedAlphabet;
    //#2
    const viewMaxHeight = alphabetView_position.height + alphabetView_position.y;
    //#3
    const locationOnscreen = moveY;
    //#4
    if (moveY >= alphabetView_position.y && moveY <= viewMaxHeight) {
        //#5
        const currentPosition = locationOnscreen - alphabetView_position.y;
        //#6
        alphabetIndex = Math.floor(currentPosition / alphabet_size.height);
    }
    return alphabetIndex;
}
Let’s go over the code:
- We store the previously selected alphabet index to the variable. In case of failure to identify, the index or the user taps out of the bounds of holder view, we return the previously selected Alphabet index.
- We calculate the max height of the holder view, i.e., the max height the holder view is occupying in screen co-ordinates.
- We only consider moveY because the pan/tap is vertical as the alphabet list is displayed vertically.
- We check if the moveY is within the holder view bounds. If not in bounds, we return the previously selected index from #1.
- We take the location of the tap calculated in #4 and subtract the y position of alphabet_size from it. This will give us the position within the holder view bounds.
- We take the value we got in #5 and divide it by the height in alphabet_size. We will round up the value to get the index.
This is the selected index that is returned.
Note: With this the Alphabet list is completed and it will work in Android. For iOS we need to make a few changes in calculations. We will do it later after the second section is implemented.
Since the Alphabet List is ready, let’s move to the second section.
||. Create Contacts list screen using the Alphabet list:
const displayData = [
    {
        title: 'A',
        data: ['Abhilash', 'Alfred', 'Anand', 'Andy', 'Aravind', 'Ashok'],
    },
    {
        title: 'B',
        data: ['Baker', 'Barber', 'Batista', 'Beerus', 'Bailey', 'Brianna', 'Brooklyn'],
    },
    {
        title: 'C',
        data: ['Caleb', 'Carson', 'Charlie', 'Chris', 'Connor'],
    }
];
Create a new file name ContactsList.js. And add the following imports
import React, { useRef } from "react";
import { Platform, SectionList, StyleSheet, View } from "react-native";
import AlphabetList from "./AlphabetList";
These imports the modules required for implementing the Screen.
Add the following code to the file.
function ContactsList(props) {
    //#1
    const data = props.data;
    const sectionListRef = useRef(null);
    return (
        //#2

            //#3

                //#4
                 {
                        const showBorder = (item.section.data.length - 1) > item.index
                        return
                    }}
                    showsVerticalScrollIndicator={false}
                    renderSectionHeader={({ section: { title } }) => {
                        return
                    }}
                />
                //#5


    );
}
const styles = StyleSheet.create({
    mainViewStyle: {
        flex: 1,
        flexDirection: 'column',
        backgroundColor: 'white',
    },
    contactsViewStyle: {
        flexDirection: 'row',
        backgroundColor: 'clear',
    },
});
export default ContactsList;
Let’s go over the code:
- Data to display will be passed from props “data”. The data is stored in a variable.
SectionListRef is used to maintain a reference to section list scroll it to the selected alphabet index. - This is the view which will occupy the whole screen and has the section list and alphabet list. Let’s call the main view (wherever the main view is used in this section it means this view).
- This is the view which has the section list and AlphabetList components. Let’s call it contact View (wherever the contact view is used in this section it means this view).
This view renders them horizontally, i.e., flex direction is row. - We use section list to show the contacts with headers. The data variable form #1 is the source for this.
For showing individual contact we use a ContactView which contains the UI to show contact name. For the showing section we use ContactHeader which contains the UI to show sections. We use the SectionListRef from #1 and assign it to “ref” prop. This will maintain the reference to the section list.
Use the code below for ContactView and ContactHeader. - This is the Alphabet List we created in 1st section. We pass a function onSelectAlphabet to the “onSelect” prop to perform action when an alphabet is selected.
Note: As mentioned earlier, the contacts should be sorted and passed in the above format to the “data” prop of ContactList function.
Create files for ContactView.js and ContactHeader.js and copy the code below to those files.
ContactView.js:
import { View, Text, StyleSheet, Pressable } from "react-native";
function ContactView(props) {
    function didPress() {
        props.onPress(props.text);
    }
    return (


                    {props.text}


            {(props.showBorder ?? true) ?  : null}

    );
}
const styles = StyleSheet.create({
    mainViewStyle: {
        backgroundColor: 'clear',
        paddingLeft: 15,
        paddingTop: 5,
    },
    holderView: {
        backgroundColor: 'clear',
        paddingBottom: 5,
    },
    borderStyle: {
        borderBottomColor: 'lightgray',
        borderBottomWidth: 1,
 },
    textStyle: {
        color: 'black',
        fontSize: 18,
    },
    pressableStyle: {
    }
});
export default ContactView;
ContactHeader.js :
import { View, Text, StyleSheet } from "react-native";
function ContactHeader(props) {
    return (

            {props.text}

    );
}
const styles = StyleSheet.create({
    mainViewStyle: {
        backgroundColor: 'lightgray',
        paddingLeft: 15,
    },
    textStyle: {
        fontSize: 22,
        fontWeight: 'bold',
        color: 'black',
    }
});
export default ContactHeader;
Note: Once the above are implemented don’t forget to import them to the file.
Create the following function to respond to a contact selection action.
function didSelectContact(contact) {
    console.log(contact);
}
Note: Currently we are just logging the selected contact.
Create the following function to respond to Alphabet selection in Alphabet list.
function onSelectAlphabet(alphabet) {
    let defaultIndex = Platform.OS === 'ios' ? -1 : 0;
    //#1
    const selectedSectionIndex = data.findIndex((value) => {
        if ("title" in value) {
            const title = value.title;
            if (typeof (title) === 'string' && typeof (alphabet) === 'string') {
                return title === alphabet
            }
            return false
        } else {
            return false
        }
    })
    //#2
    if (typeof (selectedSectionIndex) === 'number' && selectedSectionIndex >= 0) {
        if (selectedSectionIndex == 0 && Platform.OS === 'ios') {
            defaultIndex = 0
        }
        sectionListRef.current.scrollToLocation({
            animated: true,
            sectionIndex: selectedSectionIndex,
            itemIndex: defaultIndex,
            viewOffset: 0,
        });
    } else {
        console.log(`Unalbe to identify section. ${selectedSectionIndex}`);
    }
}
Let’s go over the code:
- We identify the section which has the selected alphabet by comparing the alphabet returned in prop of this function with the “title” key in the data used by section list. This returns the index of the section.
- We use the ref taken earlier from section list and saved it in sectionListRef variable and scroll to the selected section in section list.
Now the contacts list screen is ready to use.
Wherever required the ContactsList screen can be used. The only requirement is that the data to display should be sorted and formatted as mentioned above and passed to the “data” prop of ContactsList.
Note: With the above changes, the functionality will work as expected for Android. For iOS the selected alphabet index identification in AlphabetList.js will not work as expected because of the difference in behavior of pan gestures in Android and iOS.
Changes Required for iOS:
The difference is that the Android pan gesture passes the X0, Y0, moveX, and moveY in coordinates with reference to the bottom of status bar. Whereas in iOS those are with reference to screen edges.
To account for that replace the IdentifyAlphabet function with the below.
function IdentifyAlphabet(moveX, moveY) {
    let alphabetIndex = selectedAlphabet;
    const statusBarHeight = getStatusBarHeight()
    const ios_maxHeight = alphabetView_position.height + alphabetView_position.y + statusBarHeight;
    const android_maxHeight = alphabetView_position.height + alphabetView_position.y;
    const viewMaxHeight = Platform.OS === 'ios' ? (ios_maxHeight) : (android_maxHeight);
    const locationOnscreen = (Platform.OS === 'ios' ? (moveY - statusBarHeight) : moveY)
    if (moveY >= alphabetView_position.y && moveY <= viewMaxHeight) {
        const currentPosition = locationOnscreen - alphabetView_position.y;
        alphabetIndex = Math.floor(currentPosition / alphabet_size.height);
    }
    return alphabetIndex;
}
Finishing Up
In app.js file return the view as following and this will show the Contacts list UI with the new Alphabet List Implementation.
return (


);
To conclude, readers are encouraged to apply the presented concepts and code snippets to create their own contact list screens in React Native. The provided UI implementation offered a solid foundation that could be customized and extended according to specific requirements.
 |
Kiran Mandalapu occupies the role of Senior Technical Associate at Evoke Technologies, demonstrating both extensive technical acumen and practical experience in the realm of mobile technology development. He has applied his expertise across multiple sectors, ranging from Hospitality, Networking devices clients, E-mail clients and password managers. |


