

Mobile applications should be designed intelligently keeping into consideration the needs and expectations of the target audience. And while developing mobile applications, our focus should always be on creating apps that are faster, smarter, and deliver the right results. In order to do so, a mobile app should be able to perform tasks with minimal clicks, be highly intuitive and offer offline support at the same time.
In this blog, we will focus on building offline-first mobile apps using the popular hybrid platform Cordova.
Offline-first Mobile Apps
Offline-first mobile apps have more use cases than the ones that are connected. Although, building an offline-first mobile app is still progressing slowly, but the benefits of working seamlessly even when the WiFi is spotty or the bandwidth is low can’t be ignored. While developing apps, developers should focus on providing an offline-first feature that lets users interact with the app even when there’s no reliable connectivity.
Many enterprises have already developed offline-first mobile apps and Google is one of them. Google Maps as you know is one of the most reliable navigation service application in the market. But, with a weak internet connection, even Google Maps struggles to fetch accurate information. To resolve the issue, Google has come up with a pair ‘offline’ feature which lets you download the route even when the internet connectivity is disabled or spotty. It has features to save specific areas from the map including navigation services directly to your mobile phone or tablet and display content whenever requested.

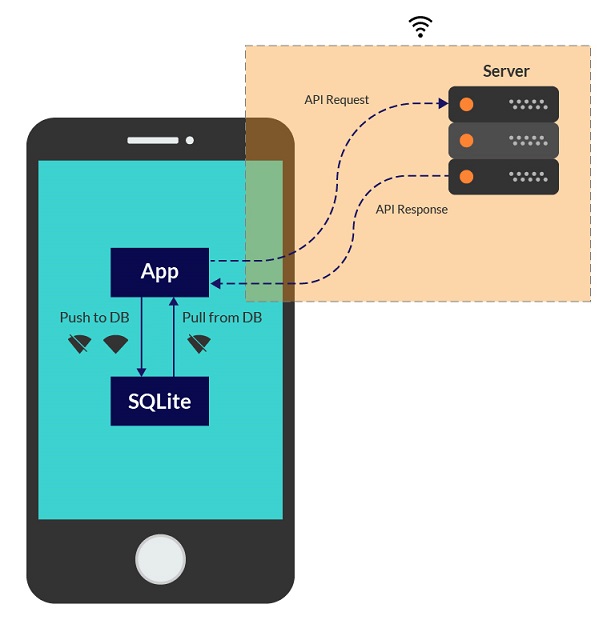
Offline-first Architecture
We cannot show remote data when there is no internet connectivity. Hence, we will store the remote data to the device storage. When the internet is not available, we pull this data from internal storage and display it to the user. This is called an offline mechanism.
Following diagram depicts the architecture of offline functionality in a mobile app.
Types of Data Storage in Hybrid Mobile Apps
Here are the 6 ways to store data in an application:
- Session Storage: It is used for temporary storage and gets cleared as soon as the application is closed. It uses a key-value pair.
- Local Storage: It is used for persistent storage and uses a key-value pair. It can store up to 5MB of data.
- Cookies: Cookies are often used as storage type on the web. It also uses a key-value pair.
- Web SQL: Web SQL is web SQLite. It allows up to 5MB max data storage. Only Android and iOS have WebSQL, whereas Windows has Index DB.
- Native SQLite Storage: It is a plugin that will point to native SQLite of the respective platform. It is easy to maintain, lightweight, and flexible. It can store unlimited data.
- Index DB: It is a sequential database of windows phone platform. It is not easily maintainable like SQLite. It also uses key-value pair storage.
Let’s explore how to build an offline mode mobile app using the popular Hybrid Platform Cordova.
Install Following Prerequisites
- Java Development Kit 8 (JDK 8)
- Android SDK for Android build, XCode for iOS build
- NodeJS npm for CLI operations like project creation, plugins and build generations.
Create New Project using NPM
- Install Cordova using NPM
- Windows : $ npm install -g cordova
- OS X and Linux : $ sudo npm install -g cordova
- Create a Project
- Windows: $ cordova create foldername com.CordovaExample.OfflineSample Projectname
- OS X and Linux : $ sudo cordova create foldername com.CordovaExample.OfflineSample Projectname
- Create Platforms
- Windows
- $ cd foldername
- $ cordova platform add android
- $ cordova platform add ios
- OS X and Linux
- $ sudo cd foldername
- $ sudo cordova platform add android
- $ sudo cordova platform add ios
- Windows
Design Patterns Required
Here are a few points to be noted:
- We use design patterns that are well-structured, maintainable and preserve code extensibility.
- The selection of a design pattern depends on the type of requirement.
- The four popular design patterns are Prototype, Module, Observer, and Singleton.
- In Hybrid app, a prototype is the most commonly used design pattern, which we will use in the demo. It obeys OOPS concepts. An object created for constructor will have the prototype object.
Let’s create an object for App()
//constructor
var App = function(){
var index = 0, dataLength = 0;
};
var app = new App(); // Creation object
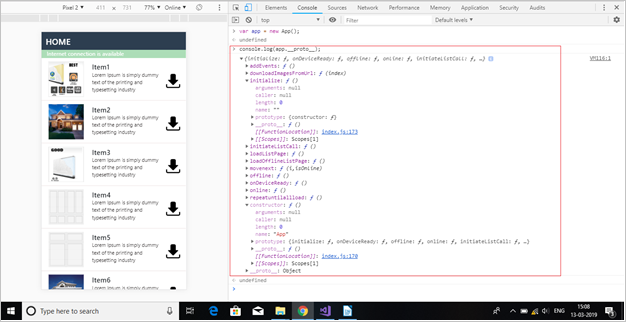
If we console app object, prototype property will have constructor property. The constructor will again point to the prototype object as below:
{constructor: ƒ}
constructor: ƒ ()
arguments: null
caller: null
length: 0
name: "App"
prototype: {constructor: ƒ}
__proto__: ƒ ()
[[FunctionLocation]]: VM45:1
[[Scopes]]: Scopes[1]
__proto__: Object
Let’s add another function using the prototype to the App constructor:
App.prototype.initialize = function(){
document.addEventListener('deviceready', this.onDeviceReady.bind(this), false);
};
Above method will be cloned to the prototype using prototype property, like shown below. We can also extend the number of methods.
Any prototype methods can be called from other methods using ‘this’ keyword.
Offline Implementation
Let’s create an offline demo using a prototype design pattern with the Cordova framework. We will list down the items with download icon on the right side. The common code will run on a browser without Cordova and on any mobile OS with Cordova. On a mobile, a user can save the item by clicking on the download button in the SQLite using the native plugin.
For the UI in Hybrid app, add required CSS, JavaScript libraries to the project in index.html
Add CSS within the head tag
And add JavaScript files at the end of the file:
//Remove if you are running on web
For security reasons, it will not allow third-party URLs.
Below is the default meta tag.
<meta http-equiv="Content-Security-Policy" content="default-src 'self' data: gap: https://ssl.gstatic.com 'unsafe-eval'; style-src 'self' 'unsafe-inline'; media-src *; img-src 'self' data: content:;">
In order to add third-party images in the list, change the security policy as shown below.
<meta http-equiv="Content-Security-Policy" content="default-src * gap: data: blob: 'unsafe-inline' 'unsafe-eval' ws: wss:; connect-src * data: blob: ws: wss:;">
Check when the document is ready to download.
var app;
// Triggered when DOM loaded
$(document).ready(function() {
console.log("ready!");
platformname = $('html').attr('platform');
app = new App();
if (platformname == 'web') // if web
app.onDeviceReady();
else
app.initialize();
});
To check whether the code is running on web or Android, we have to manually add platform attribute to the HTML tag and initialize the method.
<html platform="android">
App.prototype.initialize = function(){
document.addEventListener('deviceready', this.onDeviceReady.bind(this), false);
};
Check for internet connection
document.addEventListener("offline", this.offline.bind(this), false);
document.addEventListener("online", this.online.bind(this), false);
These listeners will call the mobile native internet connectivity code. So, we have to add below native plugins.
To store data in SQLite DB, add the plugins first.
cordova plugin add cordova-plugin-network-information
cordova plugin add cordova-sqlite-storage
We are going to show the status of the internet connection as a subheader below the navigation header. So that developers will understand which data is actually getting displayed to the end users.
App.prototype.offline = function() {
$('#internet_div').css('background-color', 'rgba(189, 33, 48, 0.35)'); //Show status
$('#internet_div p').text('Internet connection is unavailable');
};
App.prototype.online = function() {
$('#internet_div').css('background-color', 'rgba(40, 167, 69, 0.39)'); // Show status
$('#internet_div p').text('Internet connection is available');
app.index = 0;
app.loadListPage();
};
If the internet is available, loadListPage() method will be called else loadOfflineListPage() method will be called.
App.prototype.initiateListCall = function() {
if (checkConnection())
this.loadListPage();
else {
this.offline();
this.loadOfflineListPage();
}
};
App.prototype.repeatuntilallload = function() {
app.index++;
if (app.index < app.dataLength)
this.loadListPage();
else
this.addEvents();
};
App.prototype.loadListPage = function() {
var srcdownload;
checkifexists(data_arr[app.index], function(b) {
if (!b)
srcdownload = “img/download.png”;
else
srcdownload = “img/downloadhighlite.png”;
var data = ‘<ul class=”listgroup”><li onclick=”app.movenext(‘+app.index+’,true);”><div class=”row “><div class=”col-4 col-sm-3 col-md-2″>’ + ‘<img src=”‘ + data_arr[app.index].img + ‘” width=”100″ height=”100″ class=”mar10″>’ + ‘</div>’ + ‘<div class=”col-6 col-sm-7 col-md-4 paddingLeft0 rel”><div class=”abscenter”>’ + ‘<h4 class=”marg0 headerText”>Item’ + (app.index + 1) + ‘</h4>’ + ‘<p class=”hinttext”>Lorem Ipsum is simply dummy text of the printing and typesetting industry</p>’ + ‘</div></div>’ + ‘<div class=”col-2 col-sm-2 col-md-6 tac downloadImages”>’ + ‘<img src=’ + srcdownload + ‘ width=”40″ height=”40″ class=”downloadImage margt40″ id=”imagedown’+app.index+'” clickattr=’+ app.index+’>’ + ‘</div>’ + ‘</div></li></ul>’;
$(‘#listview1’).append(data);
app.repeatuntilallload();
});
};
read() method will fetch the offline data from the SQLite database. In this demo, we are using static array data as shown below.
var data_arr = [{text: “Item1″,img:””}]
App.prototype.loadOfflineListPage = function() {
read(function(rowArray) {
if (rowArray.length == 0)
alert(“Offline data not found”);
offlineArray = rowArray;
for (var i = 0; i < rowArray.length; i++) {
var data = ‘<ul class=”listgroup”><li onclick=”app.movenext(‘+app.index+’,false);”><div class=”row “><div class=”col-4 col-sm-2″>’ + ‘<img src=”‘ + rowArray.item(i).img + ‘” width=”100″ height=”100″ class=”mar10″>’ + ‘</div>’ + ‘<div class=”col-7 col-sm-10 paddingLeft0 rel”><div class=”abscenter”>’ + ‘<h4 class=”marg0 headerText”>Item’ + (i + 1) + ‘</h4>’ + ‘<p class=”hinttext”>Lorem Ipsum is simply dummy text of the printing and typesetting industry</p>’ + ‘</div></div></div></li></ul>’;
$(‘#listview1’).append(data);
}
});
stopLoader();
};
If we’re creating listview dynamically, we have to add Events to download file icon to find out which item has to be downloaded into the database.
//Add Events to the dynamic list
App.prototype.addEvents = function() {
$(‘.downloadImage’).off(‘click’);
$(‘.downloadImage’).on(‘click’,function(event ){
event.stopPropagation();
app.downloadImagesFromUrl($(this).attr(‘clickattr’));
});
}
We must remove the event listener when we are adding listener dynamically to any HTML element. Otherwise, the event may trigger more than once.
SQLite CRUD Operations
We have to open the database using a database name with the location of the database file. First, we will check the existing plugin in the app to open the database. If the creation of a database fails, an error popup will be displayed, else we will perform CRUD operations.
//create DB
function openDatabase(callback) {
if (!window.sqlitePlugin) {
callback(true);
} else {
db = window.sqlitePlugin.openDatabase(
// options
{
name: “ImageCache.db”,
location: 1 // for iOS (0=Documents (default, visible in iTunes, backed up by iCloud), 1=Library (not visible in iTunes, backed up by iCloud, 2=Library/LocalDatabase (not visible in iTunes, not backed up by iCloud))
},
// success callback
function(msg) {
console.log(“success——–>: ” + msg);
callback(true);
},
// error callback
function(msg) {
console.log(“error: ” + msg);
alert(“oops! Something went wrong”);
}
);
}
}
//Insert in to DB
function insert(imageurl,_text,imgblob){
db.transaction(function(tx) {
tx.executeSql(“CREATE TABLE IF NOT EXISTS listdata (id integer primary key,imageurl text, img text,data text)”);
tx.executeSql(
“INSERT INTO listdata (imageurl,img,data) VALUES (?,?,?)”,
[imageurl,imgblob,_text],
function(tx, res) {
console.log(“insertId: ” + res.insertId + “, rows affected: ” + res.rowsAffected);
},
function(tx, res) {
console.log(‘error: ‘ + res.message);
});
});
}
// Verify the item before insert in DB. Removes duplication
function checkifexists(imgurl, callback) {
if (!window.sqlitePlugin) {
callback(false);
} else {
console.log(imgurl);
db.transaction(function(tx) {
tx.executeSql(
“select * from listdata where imageurl=?;”, [imgurl],
function(tx, res) {
// alert(“rows: ” + res.rows);
if (res.rows.length > 0)
callback(true);
else
callback(false);
},
function(tx, res) {
console.log(‘error: ‘ + res.message);
callback(false);
});
});
}
}
We have image URLs which will automatically fetch the image byte array and show image tag SRC attribute. But in an offline mode, we just cannot store the image URL, hence we convert the image URL to base64 by using the below method.
//Convert image url to base 64
App.prototype.downloadImagesFromUrl = function(index) {
if (platformname == ‘web’) { //web platform
alert(“Cannot save data in to sqlite on web “);
return;
}
if (!checkConnection()) { // internet is unavailable
alert(“Cannot download as internet not available”);
return;
}
checkifexists(data_arr[index], function(b) {
if (!b) { // if not exists
toDataUrl(data_arr[index], function(myBase64) {
//console.log(myBase64); // myBase64 is the base64 string
stopLoader();
alert(“saved on device”);
$(‘#imagedown’+index).src(‘img/downloadhighlite.png’)
});
} else // base64 already exists in the database
alert(“Already exists”);
});
};
Use Cases to Test
- On launching the app, the user will see the status of internet connection just below the header as “Internet is not available” when WiFi is unavailable.
- If any offline data exists in the local storage, the user will see a list of offline data/image/status.
- If the user clicks on any one of the items, it will navigate to the next page and display the information about that item (even when the connection is unavailable).
- If no data exists, it will display ‘Offline data is not available.’
- When internet connectivity is available, automatically the offline data will be queued to be uploaded via an API. This process happens seamlessly in the background.
Offline Mode Advantages
- Offline storage is useful when there is a large number of data/images/videos to be called from API. Usually, it takes a lot of time to load heavy data from the server. So, we will call the API once, store the data in the local storage and display it to the user as and when required. The local database would be altered when changes take place in the server.
- SQLite is lightweight, simple and faster than file operations.
- In remote areas, where there is a lack of internet connectivity, offline mode helps in business continuity for field persons.
- Offline-first mobile apps are extremely beneficial for e-commerce applications, offline maps, pre-sales, and product configuration applications.
Disadvantages
- When offline, the data displayed to the user may not be up to date.
- Although there are no limitations on max data storage in SQLite, it is recommended to keep the process simple and flexible. Storage depends on the phone’s storage capacity.
- To implement an offline mode, mobile app code changes have to made in both API and the app to add queuing, while syncing support.
Through this blog post, I have tried to exhibit how Offline-first Mobile Apps can be used to build compelling applications that can work seamlessly, even when there is low to no internet connectivity. Which eventually will lead to better user experiences even in challenging network connectivity scenarios such as being stuck in a train tunnel, having to rely on over-crowded conference Wi-Fi, or passing through a ‘No-Network’ zone. And it’s now safe to say that apps working on offline mode ensure a leg up on the competition, and greater customer loyalty.
Evoke’s Hybrid App Development Services
The hybrid app development experts at Evoke understand the growing needs and complexity of a modern mobile enterprise and build reliable and robust mobile applications that work seamlessly across all platforms. Our innovative and feature-rich hybrid mobile apps enable our clients to reduce costs and drive maximum return on investment. Our unparalleled hybrid app development, maintenance, and support services ensure optimized performance of mobile apps across devices. To learn more about Evoke’s hybrid app development services, please talk to us at +1 (937) 660-4923 or fill our online form.
Author
 |
Nagaraju Gaddam works as a Senior Technical Associate at Evoke technologies with hands-on experience of working on various technologies and frameworks such as Android, Cordova, Kony, Xamarin and React Native. He calls himself a tech enthusiast and in his personal time, loves spending quality time with his kid and the family. |


1 Comment
I came across your blog. Very detailed and well explained. I will try this myself.