 The Bonita Engine utilizes an RDBMS (Relational Database Management System) to store information relating to the deployed process definitions, process configurations, history of process execution, users, etc. The installation comes with the H2 database as a default configuration. However, in the production environment, Bonita developers may need to use a robust database such as Oracle or Microsoft SQL Server. Additionally, Bonita makes use of Bitronix Transaction Manager (BTM) and XADataSource for container managed transactions (Global Transactions).
While integrating XA DataSource with Bitronix Transaction Manager, we observed minor issues. The primary reason for writing this blog is to help Bonita developers overcome issues faced with XA DataSource by integrating JAVA Transaction Data Source (JTDS) with Bitronix Transaction Manager. Bonitasoft offers excellent documentation on various database configurations using the XA DataSource. In this blog, we would be following similar steps outlined in the Bonita documentation while using the JAVA Transaction Data Source.
Note: Changing the database can only be accomplished with the Bonita Tomcat bundle and not with the Bonita studio.
Development Environment
Here’s a quick overview of the development environment:
- Bonita 7.2 Server Bundle
- Java 1.7
- Microsoft SQL Server 2008 R2
- Microsoft SQL Server Management Studio
- Tomcat 7.0 (Supplied with Bonita Bundle)
- Microsoft Windows
Steps Involved in the Process
Here is a step-by-step process to accomplish the integration process:
- Create Database and User Account
- Specify the Database Vendor
- Add the JDBC Driver
- Configure Data Source
- Remove H2
- Configure SQL Server specific settings for JTDS
Step 1 – Create Database and User Account
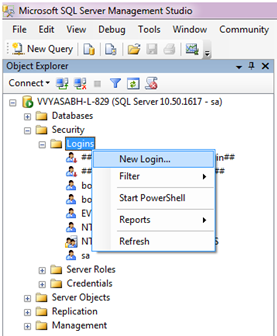
a) Launch the Microsoft SQL Server Management Studio with the default user name ‘sa’ and password ‘sa123456SA’. Subsequently, create a user login as depicted below; in this case it is ‘bonitadev’.
b) Create databases (schema) as depicted below. In this case it is ‘bonitajournal’ (for journal db) and ‘bonitabdm’ (for business data). Make ‘bonitadev’ as the owner for both the databases. In the below illustration, we have depicted the process of ‘bonitajournal’ schema creation. Repeat the same procedure for the ‘bonitabdm’ schema as well.
c) Grant all permissions for ‘bonitadev’ user to ‘bonitajournal’ and ‘bonitabdm’ databases.
d) Disconnect and reconnect to the Microsoft SQL Server Management Studio as ‘bonitadev’ user and run the below queries to ascertain if the newly created user has all relevant permissions.
[java]
create table test (id integer);
insert into test values (234);
select * from test;
drop table test;
[/java]
e) If any problems are identified while executing the above queries, verify the permissions to ensure all steps are executed properly.
Step 2 – Specify the Database Vendor
a) Locate and open the file in <TOMCAT_BUNDLE_HOME >\bin\setenv.bat
b) Modify the following lines
[java]set DB_OPTS="-Dsysprop.bonita.db.vendor=h2" TO
set DB_OPTS="-Dsysprop.bonita.db.vendor=sqlserver"[/java]
[java]set BDM_DB_OPTS="-Dsysprop.bonita.bdm.db.vendor=h2" TO
set BDM_DB_OPTS="-Dsysprop.bonita.bdm.db.vendor=sqlserver"[/java]
Step 3 – Add JDBC Driver
Download the SQL Server and JTDS Drivers from the following sources:
SQL Server Driver
Here is the link to download Microsoft JDBC Driver 6.0, 4.2, 4.1, or 4.0 for SQL Server.
JTDS Driver
Here is the link to download SQL Server JDBC driver.
Adding JDBC Drivers to the application server
Unpack both the folders, locate the following jar files and copy them to the lib folder as mentioned below.
[java]
TOMCAT_BUNDLE_HOME\lib\bonita folder
[/java]
Note: SQL Server Driver is sqljdbc4.jar and JTDS driver is jtds-1.3.1.jar.
Step 4 – Configure the Data Source
Configuration of data source for Apache Tomcat is segregated into two parts. Since Tomcat server does not support the Java Transaction API (JTA) by default, one of the data sources will be configured in the Bitronix configuration file and the other one will be configured in the standard Tomcat context configuration file.
JTDS – Transactional Data Source (Managed by Bitronix)
- Open <TOMCAT_BUNDLE_HOME>/conf/bitronix-resources.properties file.
- There are two sections in this file. The first part is “BONITA Standard Datasource” and the second part is “BONITA ‘Business Data’ Datasource”.
- The changes to the first part (Bonita Standard Datasource) are as follows:
- Comment out the lines relating to the H2 database as shown below.
[java]#resource.ds1.className=org.h2.jdbcx.JdbcDataSource
#resource.ds1.driverProperties.user=sa
#resource.ds1.driverProperties.password=
#resource.ds1.driverProperties.URL=jdbc:h2:tcp://localhost:9091/bonita_journal.db;MVCC=TRUE;DB_CLOSE_ON_EXIT=FLASE;IGNORECASE=TRUE;
#resource.ds1.testQuery=SELECT 1[/java]
- Add the SQL Server configuration details mentioned in Step 1 ‘a’ and ‘b’ as shown below.
[java]resource.ds1.className=net.sourceforge.jtds.jdbcx.JtdsDataSource
resource.ds1.driverProperties.user=bonitadev
resource.ds1.driverProperties.password=Bonita_Dev
resource.ds1.driverProperties.serverName=localhost
resource.ds1.driverProperties.portNumber=1433
resource.ds1.driverProperties.databaseName=bonitajournal
resource.ds1.testQuery=SELECT 1[/java]
Below are the changes to be made to the second part (Bonita ‘Business Data‘ Datasource).
- Comment the lines relating to the H2 database as shown below.
[java]#resource.ds2.className=org.h2.jdbcx.JdbcDataSource
#resource.ds2.driverProperties.user=sa
#resource.ds2.driverProperties.password=
#resource.ds2.driverProperties.URL=jdbc:h2:tcp://localhost:9091/business_data.db;MVCC=TRUE;DB_CLOSE_ON_EXIT=FALSE;IGNORECASE=TRUE;
#resource.ds2.testQuery=SELECT 1[/java]
- Add the SQL Server configuration details mentioned in Step 1 ‘a’ and ‘b’ as shown below.
[java]resource.ds2.className=net.sourceforge.jtds.jdbcx.JtdsDataSource
resource.ds2.driverProperties.user=bonitadev
resource.ds2.driverProperties.password=Bonita_Dev
resource.ds2.driverProperties.serverName=localhost
resource.ds2.driverProperties.portNumber=1433
resource.ds2.driverProperties.databaseName=bonitabdm
#resource.ds2.driverProperties.URL=jdbc:jtds:sqlserver://localhost:1433;database=bonita
resource.ds2.testQuery=SELECT 1[/java]
Non-Transactional Data Source
- Open <TOMCAT_BUNDLE_HOME>/conf/Catalina/localhost/bonita.xml.
- Similar to the above section, this file also has two parts. The first part is “Configure Datasource for Bonita standard database” and the second part is “Configure Business Data Datasource”.
- In the first part, comment all H2 related resources and uncomment SQL Server related resources as depicted in the code below.
[java]<Resource name="bonitaSequenceManagerDS"
auth="Container"
type="javax.sql.DataSource"
factory="org.apache.tomcat.jdbc.pool.DataSourceFactory"
maxActive="17"
minIdle="5"
maxWait="10000"
initialSize="3"
validationQuery="SELECT 1"
validationInterval="30000"
removeAbandoned="true"
logAbandoned="true"
username="bonitadev"
password="Bonita_Dev"
driverClassName="com.microsoft.sqlserver.jdbc.SQLServerDriver"
url="jdbc:sqlserver://localhost:1433;database=bonitajournal"/>[/java]
Note: Make sure that the username, password and database in the URL are correct.
- As illustrated below, repeat similar actions in the second section, comment all H2 related resources and uncomment SQL Server related resources.
[java]<Resource name="NotManagedBizDataDS"
auth="Container"
type="javax.sql.DataSource"
factory="org.apache.tomcat.jdbc.pool.DataSourceFactory"
maxActive="17"
minIdle="5"
maxWait="10000"
initialSize="3"
validationQuery="SELECT 1"
validationInterval="30000"
removeAbandoned="true"
logAbandoned="true"
username="bonitadev"
password="Bonita_Dev"
driverClassName="com.microsoft.sqlserver.jdbc.SQLServerDriver"
url="jdbc:sqlserver://localhost:1433;database=bonitabdm"/>[/java]
Note: Make sure that the username, password and database in the URL are correct.
Step 5 – Removing H2
- Remove H2 related jar files (bonita-tomcat-h2-listener-1.0.1.jar, h2-1.3.170.jar) from the <TOMCAT_BUNDLE_HOME>\lib\bonita folder.
- In order to prevent H2 from being launched automatically, remove the H2 listener. To achieve this, comment out the H2 listener in the <TOMCAT_BUNDLE_HOME>\conf\server.xml file as depicted below.
[java]<!--Listener className="org.bonitasoft.tomcat.H2Listener" tcpPort="9091"
baseDir="${bonita.home}/engine-server/work/platform" start="true" />-->[/java]
Step 6 – Configure SQL Server Specific Settings for JTDS
▪ Open the JTDS driver zip file which was downloaded as per instructions in step 3.
▪ Copy \jtds\x86\XA\JtdsXA.dll file to “C:\Program Files\Microsoft SQL Server\MSSQL10_50.SQLEXPRESS\MSSQL\Binn” folder.
▪ Run the following script in SQL Server Management Studio. The same code can be found in \jtds\x86\XA\instjtds.sql file.
[java]use master
go
sp_dropextendedproc 'xp_jtdsxa'
go
sp_addextendedproc 'xp_jtdsxa', 'jtdsXA.dll'
go
grant execute on xp_jtdsxa to public
go
checkpoint
go[/java]
- A new stored procedure under Master/Programmability/Extended Stored Procedures can be observed, which confirms that the script was successfully executed.
- Open the Windows ‘Start’ menu, click on Administrative Tools -> Services.
- In ‘Services’ window, ensure that Distributed Transaction Coordinator service is set to launch automatically. Manually start it if it is not running.
- Make sure that all relevant services it depends on, namely ‘Remote Procedure Call’ and ‘Security Accounts Manager’, are also set to launch automatically.
- Run the dcomcnfg command, or click on the ‘Start’ menu, then select Administrative Tools > Component Services.
- In the left navigation pane, navigate to Component Services > Computers > My Computer > Distributed Transaction Coordinator.
- Select and right-click on ‘Local DTC’ and then ‘Properties’.
- Click on the ‘Security’ tab and ensure that the checkbox for ‘Enable XA Transactions’ is checked.
- Click on ‘Apply’ and then click OK.
- Stop and restart the SQL Server.
- Finally, run the command [<TOMCAT_BUNDLE_HOME>\bin\startup.bat] from the command prompt to start the server. Expand the tables under ‘bonitajournal’ database to ascertain if Bonita tables were created automatically.
To sum-up, the above guidelines would come in handy for Bonita developers to configure the Microsoft SQL Server database with Bonita Bundle using JTDS.
Business Process Management Consulting with Evoke Technologies
At Evoke, we offer comprehensive bpm consulting services. We bring more than a decade’s experience to the discovery, design, and deployment of effective, efficient business processes that decrease your company’s expenditures of time and money while increasing your bottom-line. And our highly trained, dedicated teams of IT engineers remain available to support you 24/7.
Call Evoke today at +1 (937) 202-4161 (select Option 2 for Sales) or contact us online to learn more about how we can help your enterprise take steps today toward greater digital maturity and so greater productivity and profitability.
Author
 |
Vineeth Kumar Vyasabhattu is a Technical Lead at Evoke Technologies. He is part of a key BPM project for a leading North American conglomerate. Vineeth is technically adept on Java/J2EE based technologies and keen to explore Hadoop and NoSQL databases. He is currently pursuing his part-time Ph.D. in Web Services and Semantic Web from JNTU Hyderabad. |


6 Comments
Thanks for the info. It really helped.
Thank you for your comments, I am glad that you found this post helpful.
did you deploy on ubuntu?
I’ve not. But as we are working on the bonita tomcat bundle it should work fine with any platform.
Thank you.
Is it working for Bonita 7.5.4 on Windows Server 2016 with SQL Server 2016?
It has been working fine with the version 7.3.X. It should even work with the later versions of it. Important thing to remember is that it works only with Deployment Bundle (Production Tomcat Bundle) but not with the Bonitasoft Studio. Please write here if still have any questions.
Thanks!